Starting a woodworking project doesn’t require a warehouse full of equipment. Whether you’re hanging a floating shelf, building a simple cutting board, or tackling furniture restoration, a thoughtful woodworking hand tools list gives you everything needed without overwhelming your budget or workshop space. This guide breaks down the essential woodworking tools that transform raw ideas into finished pieces, separates the must-haves from the nice-to-haves, and explains what each tool actually does. You’ll discover how smart tool selection saves time, money, and frustration, and why starting with quality basics beats stockpiling specialty equipment you won’t use.
Table of Contents
ToggleKey Takeaways
- A thoughtful woodworking tools list should prioritize quality hand tools like chisels, saws, and planes before purchasing expensive power equipment.
- Essential cutting tools—including a 20-inch crosscut saw, four bevel-edge chisels, and a block plane—handle most projects without requiring a warehouse of equipment.
- Measuring tools like a 25-foot tape measure and combination square prevent costly errors and ensure accurate joints and assembly.
- Bar clamps, glue, and a putty knife complete the assembly process by holding parts securely and maintaining clean finished surfaces.
- Power tools like a 10-inch miter saw, cordless drill, and random orbital sander accelerate work when starting woodworking projects but aren’t necessary from day one.
- Safety equipment—including safety glasses, hearing protection, dust masks, and proper lighting—is non-negotiable and prevents long-term health damage in your workshop.
Hand Tools Every Woodworker Should Own
Hand tools form the backbone of any woodworking setup. They’re affordable, quiet, require no electricity, and develop genuine skill, there’s a reason experienced woodworkers still reach for hand planes and chisels even with power tools on the shelf.
Cutting and Shaping Tools
A sharp crosscut saw (or handsaw) handles crosscutting tasks where speed and control matter. For most DIYers, a 20-inch saw with 10-12 teeth per inch works for general boards and trim. A ripsaw (with fewer, larger teeth) cuts along the grain more efficiently, though a quality crosscut saw handles both if budget limits purchases.
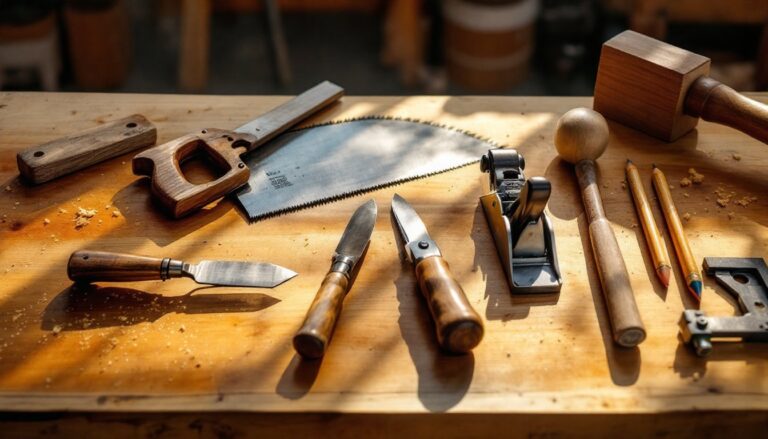
Chisels are non-negotiable. Start with a set of four bevel-edge chisels in 1/4″, 1/2″, 3/4″, and 1″ widths. These cut mortises, clean joints, and carve decorative elements. Keep them sharp, dull chisels demand dangerous pressure and produce poor results. A block plane (low-angle is versatile) smooths end grain, chamfers edges, and fits easily in tight spots where bench planes don’t work.
A coping saw cuts curves and intricate shapes: the thin blade follows tight radius turns. Pair it with a small keyhole saw for interior cutouts. Neither breaks the budget, and both solve problems no other tool can.
For woodworking hand tools list needs, don’t skip a quality mallet, wooden or rubber, to drive chisels and mortise tools without damaging handles. A 1-1/2 to 2-pound head suits most general work.
Measuring, Marking, and Assembly Tools
Measurement errors multiply fast in woodworking. A 25-foot tape measure with a 1-inch blade is the standard: thinner blades extend further without buckling. Pair it with a combination square (adjustable blade with built-in spirit level and 45-degree angle). This single tool marks cutlines, checks squareness, measures depths, and sets gauges.
A marking gauge scribes consistent lines parallel to edges, essential for laying out joints and depth cuts. A pencil and sharp pencil sharpener seem basic but matter: a fine point beats a blunt marker for accurate layout. Measuring Tools in Workshop guides explore additional precision devices.
For assembly work, a bar clamp or two holds parts while glue sets. A 2-foot clamp covers most small projects: add a 4-footer as work grows. Clamps aren’t optional, they free your hands and ensure joints stay tight during curing. A block of scrap wood (clamping caul) protects finished surfaces from clamp damage.
Clamps, glue, and a putty knife complete the assembly trio. A 3-inch flexible putty knife scrapes dried glue, fills small gaps, and cleans surfaces pre-finishing. A hammer (16-ounce claw) handles nailing and light demolition: a rubber mallet absorbs shock on finished wood.
Power Tools for Efficient Woodworking
Power tools accelerate work and handle repetitive cuts. Start with one or two reliable machines rather than a cluttered collection.
A miter saw (10-inch is the standard) cuts angle and straight crosscuts cleanly, critical for trim, shelving, and frame building. It’s safer and more accurate than a handheld circular saw for these tasks. A cordless drill-driver simplifies pre-drilling and screw fastening: lithium-ion models charge fast and hold charge well. Look for 18-20 volts and a two-battery kit so one charges while you work.
A random orbital sander flattens surfaces and prepares wood for finish faster than hand-sanding. A 5-inch model suits small projects: add a detail sander (triangular head) for edges and corners. Dust collection attachment prolongs motor life and protects lungs.
A circular saw freehand-cuts sheets and boards. Useful, but less precise than a miter saw for crosscuts, think of it as supplementary, not primary. Tool Sharpening Services keep blades in shape: dull power-tool blades create heat, binding, and tearout.
A table saw or band saw becomes worthwhile once projects include ripping boards (cutting lengthwise) or resawing thick stock into thinner pieces. Budget and space constraints often defer these purchases to year two or three. Today’s Homeowner provides context on tool investment timing.
Skip buying every specialty tool at the start. A multi-tool with sanding, grinding, and cutting attachments fills gaps without dedicated machines. Routers, planers, and jointers are valuable but not essential for small furniture and shelving projects.
Workshop Safety and Finishing Equipment
No project is worth an injury. Wear safety glasses on every shop visit, flying splinters and sanding dust damage eyes permanently. Hearing protection (earplugs or muff-style) stays in place during router, sander, and saw work.
A dust mask or respirator (N95 rated minimum for sanding dust: P100 for finishing fumes) prevents inhalation damage. Fine woodworking dust accumulates silently but causes long-term lung harm. A shop vacuum with fine-dust filter collection attached to power tools captures 80+ percent of dust at the source.
Work gloves suit handling rough lumber and machinery. Leather or cut-resistant styles protect without snagging drill chucks or saw blades. Remove gloves near rotating equipment. Steel-toed boots aren’t glamorous but prevent crushed toes from dropped tools.
For finishing, you’ll need brushes, rollers, or sprayers depending on your project. A natural-bristle brush (for oils, stains, and varnishes) outlasts synthetic for most wood products. Synthetic bristles work better with water-based acrylics and latex. A tack cloth removes dust pre-finishing, skipping this step shows in the final result.
Sandpaper in 80, 120, 150, and 220 grits covers most work: 80 for flattening rough surfaces, 220 for final prep before finish. How To Organize Tools keeps supplies accessible and dust-controlled.
Workshop lighting often gets overlooked but prevents mistakes and eye strain. A flexible work light or overhead LED strips illuminate your bench and saw table. Poor lighting leads to missed measurements and unsafe cuts. Tool Reviews can guide decisions on specific safety gear brands and lighting solutions. Keep a first-aid kit nearby, minor cuts and splinters happen.
Conclusion
A functional woodworking setup starts lean and grows thoughtfully. Invest in quality hand tools first, they develop your skill, teach technique, and last decades. Add power tools as projects demand them and budget allows. This Old House and Fix This Build That offer project inspiration once your toolkit is ready. Prioritize safety equipment and workspace organization from day one. The projects you’ll complete with intention and care beat the ones rushed with inadequate tools. Start small, sharpen what you have, and let your woodworking hand tools list expand naturally alongside your growing experience.